Showing posts with label peanut butter. Show all posts

Friday, May 6, 2016

Food Friday - Breakfast, Lunch or Dessert!

From: Tracey G.


I'll admit it, I'd rather drink my breakfast in the form of coffee, rather than eat it in form of food. I've never been one to eat breakfast, it's always the last thing I want to do when I get up. And honestly, it still takes a backseat to my first cup of coffee, I can't jump out of bed and eat. And I've never been one for "traditional" breakfast foods AT breakfast, give me cold pizza over a bowl of cereal any day! But, if there is one thing I've always liked and that would be the warm cereal varieties. I love Cream of Wheat, that was my first love. Then when oatmeal went "instant" with yummy flavors (the fruit and cream varieties!) that one became acceptable as well.

Now that I'm trying to eat mindfully, breakfast at a some point is a must. And for me it needs to be super easy and quick or I'll skip it and drink more coffee. Lately I've been seriously enjoying the little instant oatmeal cups - they have such lovely varieties for a fairly reasonable cost, and they are so fast a simple to make. But then I remembered the recipe in my favorite-make-it-homemade-cookbook, The Homemade Pantry by Alana Chernila for homemade instant oatmeal! I was intrigued! I went to Pinterest (I've come to love that site!) to see if there were other recipes for it as well, and I found a few that also sounded pretty good and very very close in method/ingredients etc. So, I pulled from a couple recipes and adapted the one from my cookbook - and was super pleased with the results and how easily it came together. Was not time consuming whatsoever. Actually, chopping the almonds I toasted so they could be added to my portions if I so choose, took the longest I think! Now, you can of course mix all of your add-ins right into the base mix, but since Harry doesn't care for nuts in his oatmeal, I left the base as is and we can add in the extras at the time of making it. You're only limited to your imagination - I always have dried berry mix on hand, dried cranberries, raisins (even though I don't like them in anything other than Raisin Bran cereal, Harry and Jeremy do) and generally an assorted variety of frozen fruit in the freezer to choose from.

A lot of recipes use powdered milk in the mix, but I read somewhere that supposedly that can cause mold to grow over time, so I followed the suggestion of using powdered non-dairy coffee creamer. I chose to use Coffee Mate Fat Free French Vanilla. When I was actually adding it in though, I discovered that it might be a bit too overpowering, so I went half regular powdered non-dairy creamer (Coffee Mate brand) and half of the Fat Free French Vanilla. I think that worked out just right!

As usual, this recipe of course can be modified to your tastes. Leave out the cinnamon or add more if you want. You can use just the 1/2 cup of brown sugar as I did or more - one recipe gave a span of 1-2 cups for the amount. I discovered the 1/2 cup was just right - and wouldn't be too sweet if I wanted to add a little extra brown sugar or maple syrup on the finished product before I eat it.

There are also many possibilities for packaging - I have it in a screw-top canister, but it can also be portioned out into snack-sized bags for individual packets or even put into a canning jar with a lid for travel or even the hot coffee cups with lids you can buy in the grocery store. There are so many possibilities, I know I will likely get portioning some out into the snack-sized bags so that it's easy for Harry to fix himself a bowl when he wants.
I am having so much fun finding recipes to help me stay on track of mindful eating - and oatmeal is a super source of all kinds of goodness!

I chose to use Quick Oats - the 1 Minute variety, for speed's sake and easy preparation in the microwave. The original recipe from the book (and some I ran across out there) use the regular old-fashioned oats. You could prepare them with boiling water poured over and then cover the bowl. If using the regular old-fashioned, I believe it's a sit time of 5 minutes while covered. If you chose to prepare the quick oats this way, of course sit time would be less. You could microwave prepare the regular old-fashioned oats too, just again, adjusting the time accordingly.

And now, on to the recipe...

Homemade Instant Oatmeal

Makes 16 half cup servings

8 cups of quick-cooking oatmeal (the 1 minute variety is what I used)
1/2 cup brown sugar
1/4 cup fat-free French Vanilla powdered coffee creamer
1/4 regular powdered coffee creamer
1 tsp salt
1 tbsp cinnamon
Add-ins of choice - dried cranberries, raisins, toasted nuts etc.

Preheat oven to 325°F. Spread oats on cookie sheets and bake for about 20 minutes. Cool slightly then, in a blender or food processor, blend 4 cups of the oats, brown sugar and salt until powdered. In a large bowl combined the rest of the oats, the blended oat-mixture and the coffee creamers. Stir well to combine. Store in a covered container for 4 weeks, in the fridge in a covered container 3 months or in the freezer for 6 months.

To prepare: Combine 1/2 cup of the oatmeal mixture and add-ins of choice if desired and 3/4 to 1 cup water and microwave 1-2 minutes or as long as necessary to desired doneness, stir and serve with  toppings of choice.

Nutritional Information for 1/2 cup of dry mix, prepared with water, with no additions (courtesy of plugging in my ingredients in the SparkPeople Recipes app):

Calories 194, Total Fat 3.4g (saturated fat .9g, polyunsaturated fat 1g, monounsaturated fat 1g) Cholesterol 0g, Sodium 151mg, Potassium 26mg, Total Carbohydrates 39.3g, Dietary Fiber 4.2g, Sugars 11.3g, Protein 5g. 


from Kris B.


Before you continue reading, there are a few things you must know.
  • Breakfast is my favorite meal
  • I love peanut butter.
  • My idea of diet food probably differs from that of most.

Now we can continue..

One thing I know about myself is that if I am going to be successful with losing weight, it has to be done somewhat on my terms.  What that means is that I need to control my caloric intake by adjusting my portion size rather than depriving myself of certain foods.  All in all, I am a healthy eater in terms of the types of food that I like and enjoy eating; I just tend to eat more than I should for a serving.  That said, I also don’t want to be overly hungry.  That will lead me to failure as well.

The SparkPeople app is more bound by routine than I am.  Every day by 12:30 it is probing me as to why I have not logged my lunch.  Simple answer.  I have not had lunch yet.  If I have a designated lunchtime, it is not until 1:30 in the afternoon.  Several of those days, breakfast happens at 6:15 am.  That makes for a long haul to lunch.  Therefore, I need to eat a breakfast that will carry me through that seven hour stretch.  That means that my breakfast generally needs to be a high protein meal and is therefore a higher calorie meal.  Enter the Peanut Butter French Toast.

This recipe came into being from the fact that I could not decide what I wanted for breakfast.  Oatmeal?  An egg sandwich?  Toast with peanut butter?  Because I could not make up my mind, I had a little bit of everything.  Oat bread spread with peanut butter, topped with bananas, and dipped in a French toast egg batter and cooked on a griddle.  With a bit of sweetness from powdered sugar and a little light butter for cooking, this recipe totals 397 calories.  Based on my schedule and eating patterns, that works for me.

MY INGREDIENTS
1 egg  (78 calories)
1 TBS light almond milk  (3 calories)
1 1/2 tsp powdered sugar, divided  (15 calories)
1/2 tsp cinnamon
1/2 tsp vanilla
2 slices Orowheat Healthful steel cut oat and honey bread  (160 calories)
1 TBS Jif creamy peanut butter  (95 calories)
1/2 banana  (55 calories)
1 tsp Land o Lakes light butter  (17 calories)

In a bowl big enough to dip the bread, beat the egg.  Add the almond milk,  1 tsp powdered sugar, cinnamon, and vanilla.  Beat until thoroughly combined.

Divide the peanut butter and spread half on each slice of bread.  Then layer one side of the bread with banana cut into slices 1/2” thick.  Top with the other slice making a peanut butter and banana sandwich.  You could stop here and life would still be good!  lol.

Dip the sandwich into the egg mixture making sure to cover both sides.

Over medium high heat, melt the butter in an appropriately sized skillet for your sandwich.  Place sandwich in skillet until the bottom is  golden brown and slightly crispy.  Turn and repeat for the other side.

Remove from heat.  Slice in half and sprinkle the remaining 1/2 tsp of powdered sugar over the top.  Serve immediately.

Half a serving of this makes a nice dessert or snack as well!

There are many ways that the calorie count of this recipe could easily be reduced.  
  • Use egg substitute instead of a real egg.
  • Skip the powdered sugar.  (But why?  It adds much more than 15 calories of goodness to the taste)
  • Use a light or low calorie bread.  There are some brands available that have only 40 calories per slice.)
  • Use a whipped peanut butter.  
  • Skip the butter.  You can spray your pan with a non-stick cookie spray and that will keep your French toast from sticking.  The butter, however, does help it to crisp and brown with the desired golden color.

Calories 398, Total Fat 17g (saturated fat 2.9g, polyunsaturated fat 1g, monounsaturated fat 1.9g) Cholesterol 192.6mg, Sodium 499.2mg, Potassium 215.7mg, Total Carbohydrates 50.3g, Dietary Fiber 10.1g, Sugars 14.9g, Protein 20.3g. 


Friday, April 29, 2016

Food Friday - Snack Attack!

from Tracey G.


Yep. I am still in a love affair with almonds. They're a great food item for many reasons, but, my main reason for them being a major player in my diet, is in helping me by providing me something good and good for me to snack on. I'm not happy with the numbers the scale is throwing at me when I get the courage to step on it, so after being annoyed about it for months, I started complaining about it to Kris. I then found out, as things usually go with the two of us, she seemed to be having the same dilemma and issues. We went back and forth enough to figure out, that, our snacking and eating habits were likely the culprits, or more directly the lack of forethought before the snacking and eating etc. It's been a busy past few months and that I know is my issue - too many other things on my brain rather than eating well. It seems when life gets busy, my eating habits get worse. I am honestly one who forgets to eat, but instead of losing weight, it's that opposite reaction my body has - thinking it's in starvation so it hangs onto every calorie I take in as it doesn't know when it's next meal is coming!

So, since I love grab-and-go foods - something to eat that I don' t have to stop what I'm doing to prepare during the day etc., I told Kris I really need to come up with some homemade versions. And versions I can live with - I've done all the so-called diets, I've gone the deprivation route, and all that has ever garnered me was failure. Every. Time. But in the times I've approached it realistically, I've achieved my weight-loss goals. Every. Time.  Even though I desperately want to see it go away immediately, I know I have to be smart about it. That means eating. And eating well, not junk, not live off totally prepackaged foods (but some do have their place, as there are good ones out there!)

First up in the grab-and-go realm for me, are snacks. I love to snack on stuff. Usually when I'm bored, so I've taken the approach of asking myself if I'm really hungry or just bored. And just by doing that alone, I've really cut down on snacking! Second is not jumping into all "diet" foods - that's a trap I get bored with and generally fail with. It's not realistic to think that "diet" treats are going to be always as satisfying as the "real deal" for me personally. This I know. It gets to the point where I've said "heck with it, I want to real stuff!" and that itself becomes a slippery slope right down into the failure pit. I know enough now, to know that I have to find alternatives I can actually live with. Plus, build in enough leeway that I can still enjoy the foods I love. So, I'm tackling snack foods. And when it comes to good-for-you snack foods, almonds fit the bill pretty well. High in protein and taste yummy, plus a whole host of other benefits.

Here's the recipe I chose this week - last week it was sweet, this week it's savory. And they are pretty yummy and so so so easy! Just enough spice and heat to be addictive and of course as usual, totally customizable in that respect. Make it as mild or spicy as you like! The recipe originally called for curry powder, but I'm not a big fan of it, nor have I found a curry blend that I like, so I used smoked paprika instead of it. Of course I'll provide measurements for both! I found this recipe through my SparkPeople "SparkRecipes" app, and it's originally from the California Almond Board, again. But, I couldn't find it at the almond site, so I am linking to the SparkPeople Recipes site. It can be found here:Firecracker Almonds

And now, the recipe!

Firecracker Almonds


Serves 8 (1/4 cup servings)

2 tsp chili powder
1 tsp curry powder - this is where I substituted 1/2 tsp smoked paprika
1 tsp garlic powder
1 tbsp olive or almond oil
2 cups toasted whole natural almonds ( I did use salted)
1/2 tsp hot pepper sauce, or to taste
1 tsp ground red pepper (cayenne) or to taste

Combine chili powder, curry powder (or smoked paprika), garlic powder and oil in a medium-sized skillet over medium heat. Heat until hot and bubbly. Stir in almonds, tossing until almonds are evenly coated and heated through, about 3-4 minutes. Remove from heat and cool slightly. Stir in pepper sauce and red pepper. Allow to cool fully before serving.

Nutritional information:
1 Serving: 218 calories; 19 g total fat (2g saturated fat, 3.9 polyunsaturated fat, 12.8 monounsaturated fat); 0 mg cholesterol; 11 mg sodium; 268 mg potassium; 8g total carbohydrate (5g dietary fiber, 0g sugars); 7g protein

Oh! And by the way, this week I used my phone for my shot of the almonds on the sheet pan. It was a busy day, so to me the phone can be a real life-saver, it allows me to snap the shot and edit all at once on the same device, and that can be extremely handy! I used the Camera+ app to take the photo, did the filtering in Hipstamatic (I used the Loftus Lens and the DC Film), and then hopped it over to the Rhonna Farrer app "RhonnaDesigns, for the text and graphic (sticker)! Easy peasy! 


from Kris B.


 After only five days of logging everything I eat into Spark People and having it spit back all of my daily nutritional information, I have noticed a trend that needs to be addressed.  I don’t get enough protein in my diet.  Who knew?  Also, because my days start early and often go late, there comes a time during the day when I need a snack.  My husband would say that I need a “happy meal.”  Yep, I am one of those people that gets ridiculously grouchy and irritable when I need to eat.

Because I am also kind of lazy, I decided to try and remedy my protein and snack issues in one move - a protein heavy snack.  The first ingredient to come to mind that fit the bill was peanut butter.  I have mentioned before that I am a huge fan of peanut butter.  However, I wasn’t sure what to DO with the peanut butter.  I remembered a recipe that I had read on a blog awhile back for peanut butter and quinoa patties.  By some miracle, i was able to find it!  The original recipe is from the blogger Blissful Basil.

INGREDIENTS
1 1/2 cups puffed quinoa
6 TBS peanut butter
6 TBS coconut butter
2 TBS coconut oil
1 1/2 TBS pure maple syrup
1 tsp vanilla extract

First, a few notes on the ingredients…

Admittedly, puffed quinoa and coconut butter may not be pantry staples at your house.  They are not at my house either, but quinoa and coconut are.  Though both of these ingredients can be purchased at a grocery store like Whole Foods, with quinoa and coconut they can both be made at home at much less expense.  In her recipe, Blissful Basil tells how to make the puffed quinoa.  Heat a large stock pot over medium heat.  Once the pot is hot, pour a small amount of pre-rinsed and dried quinoa over the bottom of the pan.  Gently move the pan so that quinoa swirls around as it pops.  The process is much like that of making stove top popcorn.  Keep things moving so that they don’t burn.  Once all of the quinoa has popped, a minute or two, Transfer the “puffed” quinoa to a bowl and repeat this process until you have a 1 1/2 cups of puffed quinoa.  During the process you will here small crackles from the quinoa as it in creases only very slightly in size.  There is not the dramatic change that you see with popped corn.  I “puffed” 1 1/2 cups and ended up with roughly 1 3/4 cups.  (The extra 1/4 will perhaps be used to top a loaf of bread.)

On amazon.com, a 16 oz. jar of coconut butter costs $13.99.  That is ridiculous when you realize what coconut butter really is.  Like peanut butter, coconut butter is made by processing the meat extensively in a food processor.  Translation…dump some coconut in your food processor.  Turn it on.  Let it run until the coconut is liquefied.  This took about 8 minutes.  I used 12 oz. of Red Mill shredded unsweetened coconut.  Because it was fairly dry, I also added a tablespoon of coconut oil to the food processor.  Again, the process is much like making homemade peanut butter.  I did use homemade peanut butter in this recipe as well (because I have it on hand), but any unsweetened commercially available peanut butter will work just fine.

Once you have all of your ingredients, these Peanut Butter Quinoa Patties are super easy to make!

In a medium saucepan over low heat, combine the peanut butter, coconut butter, coconut oil, maple syrup and vanilla.  Cook for 4-5 minutes, whisking continuously, until the ingredients are completely melted.  Pour this mixture over the puffed quinoa.  Gently stir to evenly coat.

Place 16 muffin liners on a baking sheet.  Drop heaping tablespoons of the quinoa mixture into the muffin liners.  Tap the mixture down with the spoon if necessary.  Place the tray in the freezer for about an hour to allow the patties to set.  Once set, they can be store in the refrigerator.

These Peanut Butter Quinoa Patties are not particularly sweet, but they are sweet enough that I feel like I have had a treat.  My daughter, who doesn’t really have an over active sweet tooth like I do at times, said that she thinks that these need to be half dipped in chocolate.  There is no doubt in my mind that this would be a really good idea, it is not absolutely necessary, especially if you eat one with a glass of chocolate almond milk.  There’s my secret. :-)

Here are the nutrition facts for these based on having put the recipe into Spark People’s Recipe Calculator.


In addition to agreeing to support one another along this weight loss journey, Tracey and I also agreed to take and process this week’s photo on our phones.  As she said, sometimes this makes the whole process go a little more quickly.  It also adds a little spice to our food and photography life as well as gives us a reason to play with all of those apps on our phones.

I shot my image using the resident camera on my iphone6.  I lightened it a bit using the phone’s basic editing capabilities.  In then used the Rhonna Magic app to apply a filter and the Rhonna Designs app to add the text.  The final touch was the border (frame) which was done using Rookie Cam.  

Rookie Cam is a new app to me.  Tracey suggested it because I was telling her about the fact that I wanted some simple borders for my photos but couldn’t find them in any of the apps I had.  I’m not sure how that could be, but was the truth.  Rookie Cam is a free app, sort of, so I downloaded it and there were borders exactly like a wanted - simple and clean.  If you like the more fancy type of frames, they are there too!

We hope your days are filled lots of pretty pixels, healthy plates and lots of laughs!!  Enjoy the weekend.


Friday, February 12, 2016

Food Friday - Full Bellies, Full Hearts

from Kris B.


It is Valentine's Day weekend; for many that means that love is in the air.  By the looks of the supermarkets, it appears that many will be receiving  the obligatory flowers and candy.  For others, however,  it is just another day of being hungry and feeling unloved.

Sometimes the “why” of a story is much more important than the “what.”  The “what” of my recipe this week is Oatmeal Peanut Butter Chocolate Chip Cookies.  These are undoubtedly one of my favorite cookies because they contain all of my favorite ingredients.  If I can’t decide what kind of cookies I am craving, I will make these because they cover all the bases.  You can’t go wrong with a cookie that has chocolate chips, oatmeal, AND peanut butter!  But, that is not the “why.”

I recently received a note from my youngest daughter that said, in part, “Thank you for showing me what parental love is all about.  Thank you for being willing to take on the hard questions.  Thank you for challenging me and helping me and inspiring me and encouraging me.  Thank you for helping me become me.”  The “me” that she has become is a caring and loving young lady who has made it her mission in life to do anything she can to make the world a better place for those around her.  In her daily life, she goes about this in many big and small ways; those of us that are on the receiving end of her kindness are blessed beyond measure.

This week she set her goals high, taking it upon herself to have a bake sale at work to raise money for the organization NO KID HUNGRY.  This was not your average bake sale with a few dozen slice and bake cookies and a pan of brownies.  Erin went all out, from taking pre-orders for loaves of homemade bread and chocolate dipped strawberries to baking all kinds of individual goodies to be sold today. 


 Last weekend she baked 20 loaves of bread to be delivered to friends and co-workers Monday morning as a kick-off for her fundraising week.  The rest of the baking was done yesterday for the actual bake sale today.  Her boyfriend posted the full tally of her baking efforts on Facebook:

My measly contribution to this massive effort was a few tubs of cookie dough that could be sold as take and bake.  Other than this, she did all of the work by herself with a lot moral support from her boyfriend and some from me.  Hopefully her co-workers will eat up today and she can send a nice check to NO KID HUNGRY.  


Creating a world where all people have full bellies and even fuller hearts is a grand but achievable goal if we all do what we can where we are.  All those small acts do add up to big results!

I am proud of the young lady that Erin is becoming and I am humbled to know that she credits me for even a part of that.  Hang in there all of you with little ones, those days will be over more quickly than you think.  And then comes the time when you look at your kids as they become adults and smile.  But perhaps more importantly, they will also look at you with appreciation and say, “Thank you!”

I am happy to report that Erin's goal for today's bake sale was $300.  She far surpassed this goal by raising  $1500 for No Kid Hungry!  Not only were her co-workers and friends supportive, her company volunteered to match her efforts at 100%!  If you would like to learn more about No Kid Hungry or contribute to this cause, click here.  I am thankful that there are so many people out there willing to help fill the bellies of hungry children.


Thank you, Jeff, for the photos!
Chocolate Chip Peanut Butter Cookies

INGREDIENTS

1 cup white sugar
1 cup brown sugar
1 stick butter (at room temperature)
1 cup creamy peanut butter
1 TBS vanilla extract
2 TBS milk
2 eggs
1 cup all-purpose flour
1 cup whole wheat flour
1 tsp baking soda
2 cups chocolate chips

Aside from the fact that these cookies taste awesome, I love this recipe because it doesn’t use every measuring cup that I own!  A cup measure and measuring spoons, that’s it!

In your mixer bowl, cream together the sugars, butter, peanut butter, vanilla, and milk.  Add the eggs and mix until thoroughly combined.  

In a separate bowl, mix together the flours, oats, baking soda, and chocolate chips.  Slowly add the dry ingredients to the wet, mixing well.

Chill the dough covered overnight.

When you are ready to bake, preheat the oven to 350 degrees.  Form the dough into 1” balls and place on baking sheet.  Bake for 12 minutes on the center oven rack.


from Tracey G.


When Kris was telling me of her bake sale contributions, it got me thinking of bake sales past. Mostly from my grade school days, the bake sales, cake walks and craft shows that my mom always contributed something to. I especially loved the cake walks, yep, definitely a personal favorite! I could win a cake! Yay! Not that I ever ate them, as I didn't care much for cake back then, but I probably enjoyed the chance to win one more than anything! It just brings back a lot of fond memories from 3rd grade all the way through 8th. Good stuff!

All the bake sale memories got me thinking on what would work for a bake sale as far as an item to contribute that everyone in general enjoys. Lots of things came to mind, but the one that stuck out to me was the good old Peanut Butter Cookie. They're so easy to make and you can turn them out pretty fast, (plus it's usually stuff I always have on hand - so if I'm ever in that "mom I need cookies for tomorrow!" bind, these are a good go to recipe), and perfect bake sale criteria! Fast and easy and people like them! Through the years, I've found a few recipes (as usual!), and this one is kind of a combination of a few, that got me to a cookie I really liked.

The recipe is supposed to, in theory (from the combinations of recipes), make 3 dozen, but I got at least 5 dozen out of this batch I made. Go figure. And now my taste testers/cookie eaters are sick and not interested in any cookies. I think this batch will find itself in the freezer!!


Peanut Butter Cookies

Preheat oven to 375° F
Yield: 3 dozen

1/2 c butter (1 stick), softened (you could use all vegetable shortening if you like)
1/2 c vegetable shortening
1 1/2 c peanut butter
1 c granulated sugar
1 c brown sugar, packed
1 tsp vanilla
3 eggs
3 c all purpose flour
2 tsp baking soda
1/4 tsp salt

1) Preheat oven to 375°F. In a large bowl, cream butter, shortening, peanut butter, granulated sugar, brown sugar and vanilla until light and fluffy. Add eggs, one at a time, beating well after each addition. In another bowl, combine flour, baking soda and salt; add to creamed mixture and mix well.

2) Roll into 1 1/2 inch balls and place 3 inches apart on ungreased baking sheet. Flatten with a fork. Bake 10-15 minutes. Remove to wire racks to cool. 


Thursday, August 20, 2015

Food Friday - After School Snacks

from Kris B.


We all remember those days of getting home from school and rushing to the kitchen because we were starved.  A cookie or two and a glass of milk and then it was off to do homework while mom fixed dinner.  

School lunch schedules never seem to take into account the body's normal hunger patterns.  Lunch often happens way too early in the day, making for extremely long afternoons!  Even as an adult, I still get home from school in the afternoon's hungry.  The problem is that it is nearly 5:00 at that point and I am the one who has to fix dinner!  I often find myself say, "I'll just have a little something to eat before I start cooking."  Well, that often turns into more than "a little something" and by the time dinner is ready, I don't really want it.  This is a terribly bad cycle!

These Peanut Butter Snack Bites are just enough to curb the appetite and take the hunger edge away before fixing dinner.  They have some protein, carbohydrates, fruit, and some sweetness to boost what is for me the inevitable afternoon slump.  And, rather than the childhood favorite of an accompanying glass of milk, it is an afternoon cup of coffee.  Another dose of caffeine helps with the much needed pick-me-up as well.  These may not be the absolute healthiest afternoon snack, but they certainly aren't the worst, either!

INGREDIENTS

2 TBS butter
2/3 Cup natural peanut butter
1/4 Cup powdered sugar
3 TBS honey
1/2 tsp vanilla
1 1/2 Cups Rice Krispies
1 Cup quick cooking oats
*1/4 Cup mini chocolate chips
*1/4 raisins
1/4 Cup finely chopped, lightly salted peanuts


This recipe makes me thankful for my 1980's Tupperware measuring spoon set that has 1/4  and 1/3 measures.  Normally I don't like recipes that require every measuring device that I own, but because you have to work sort of quickly as far as mixing the ingredients, pre-measuring and lining up all of the ingredients works best here.

You probably all know this, but in case you don't, here is a tip that is helpful when using a couple of these ingredients.  To ens ure that you get the full measure of the honey and peanut butter, or any other ingredient that may stick to the sides of the measuring cup, coat the measuring cup or spoon with a light coating of cooking spray.  This allows the "clingy" ingredients to slide right out and none is lost or wasted by sticking.

Melt the butter in a medium saucepan.  Remove it from the heat and stir in the peanut butter, powdered sugar, honey, and vanilla.  Once these are well-mixed add the Rice Krispies and the oatmeal.  

Let the mixture cool completely and then add the raisins and the chocolate chips.


* Because nothing is simple at my house, I make two batches of these - one with only chocolate chips, and one with only raisins, using 1/2 cup of each.  Though I like chocolate covered raisins alone, I really don't care for chocolate and raisins in my cookies.  So I opt for just the chocolate.  Big surprise.  LOL!  My husband also like chocolate covered raisins, but doesn't want chocolate in his cookies, so his batch is made with only raisins.  Because these are so simple to make, doing it twice is no big deal.

Once cooled, shape the mixture into balls.  I use a small cookie scoop to maintain uniformity of size.  Roll each ball in the chopped peanuts.  


Makes about 24 balls.

Store in the refrigerator.

As an aside, Tracey and I often discuss when and how we are shooting these blog photos.  As you may have noticed, the lighting in my kitchen is TERRIBLE!  Tracey has said the same thing about hers as well.  We all know how important good light is to good photos.  We all also know that bad food photos are some of the worst bad photography there is!  These two things make shooting the photos for these posts super challenging for me.  It is forcing me to better my photography skills...at least I am hoping they are improving a little bit.  We remodeled our kitchen a few years ago, before i was addicted to photography, land long before I thought that I would ever engage in food photography.  If I had known then what I know now, I would have designed the kitchen layout to maximize the light for photos rather than for ease of cooking. LOL.  Hindsight is always 20/20!


 by Tracey G


These are one of my favorite treats - a snack that I think works for any time of day, they're not too sweet and nicely tangy and lemony - which for me works anytime. So, as an after-school snack, they're perfect! Maybe not a whole lot of nutritional value, lol, but they sure do taste good and make you smile - and that can be very important after a long day at school, in any grade or any level, whether student, teacher or parent! :-)

I've searched for years for one that I like, last one I had tasted too "eggy" to me, the lemon kind of got lost in all the egginess of the flavor. So, after a bit of searching around, I found this recipe, and with a few tweaks that made it mine and to get it just the way I liked it and wanted it, this is the result, and I couldn't be happier. And apparently neither could Harry because he's been eating way more of these than he ever did of the old recipe! :-D And they are so easy! I actually had everything on hand - usually there's a couple ingredients I need to pick up for whatever treat I'm making, but not this one. Had everything I needed and it came together quickly, longest parts were taking the photos and the cooling time before the dusting of powdered sugar and eating! LOL

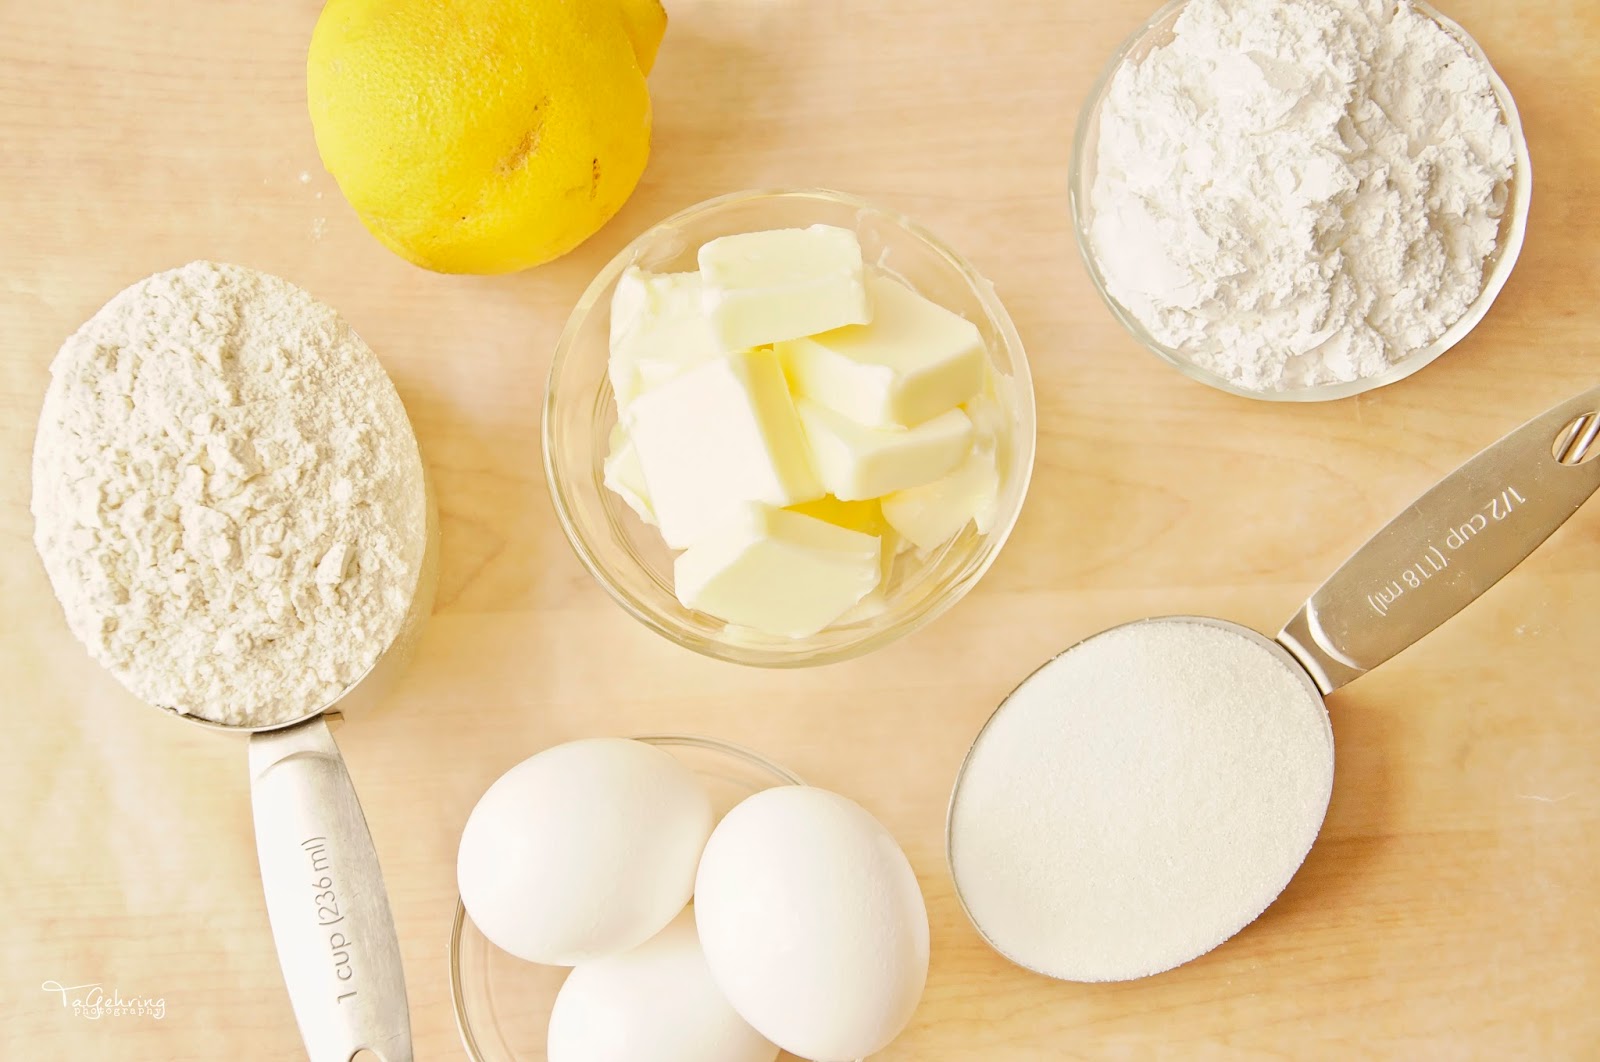
I actually got every ingredient  this time in the photo! LOL The players in this recipe are: flour, lemon juice and zest, powdered sugar, granulated sugar, eggs and butter. That's it. Pretty simple and even if I don't have fresh lemons on hand, which I pretty much always do, but I could even make it with bottled lemon juice and skip the zest. Not that I'd want to, but hey, if a craving hit - anything's in play and fair to use! ;-) 

Preheat the oven to 350°. In a bowl, beat the butter and powdered sugar...

...until smooth and well combined.

Gradually add in the flour until a soft dough forms. Press the dough in the bottom of a greased 9x13" baking pan. Bake 18-20 minutes or until lightly browned. 

Pour the egg mixture over the hot crust.

Bake 20-25 minutes or until lightly browned and lemon mixture is set. Cool completely on a wire rack, then dust with additional powdered sugar. Cut into squares and store the leftovers in the refrigerator - if there are any, lol.


Lovely Lemon Bars


3/4 c butter, softened
2/3 c powdered sugar
1 1/2 c + 3 tbsp all-purpose flour, divided
3 eggs
1 1/4 c sugar
1/3 c lemon juice
zest from one lemon (or more if you prefer!)
additional powdered sugar for dusting

 1) Preheat oven to 350°. In a large bowl, beat butter and powdered sugar until well blended and smooth. Gradually add in 1-1/2 cups flour. Press into the bottom of a greased 9x13 inch baking pan. Bake 18-20 minutes or until crust is golden brown.

2) Meanwhile, in a small to medium sized bowl, whisk eggs, granulated sugar, flour, lemon juice and lemon zest until frothy. Pour over hot crust.

3) Bake 20-25 minutes or until lightly browned and lemon mixture is set. Cool completely on wire rack, dust with additional powdered sugar. Cut into squares. Yield is about 4 dozen.