From Kris B.

It is always a pleasant surprise when you meet someone who not only likes and appreciates your "good" qualities, but also understands and even shares some of your more quirky and less mainstream ideas and traits.
Cinnamon Almonds and Salted Butter Toffee Pecans
It is always a pleasant surprise when you meet someone who not only likes and appreciates your "good" qualities, but also understands and even shares some of your more quirky and less mainstream ideas and traits.
In an effort to establish a plan for our upcoming posts, Tracey and I were sharing ideas back and forth about Food Fridays. Since the Super Bowl is this weekend, I suggested that we might share recipes for a few of our favorite snacks. The email exchanges between the two of us on this topic were rather hilarious, at least to me:-)
Me: We are not football fans, but next weekend is the Super Bowl. Maybe we can do a favorite snack recipe??
Tracey: ... LOL. I can remember in high school, my boyfriend played and I'd go to his games, but I'd always get there late, then it was a big social fest for me, lol. I can remember him asking me about whether or not I saw this play he made or that one, and lol, nope, sorry....Football was just never my thing and I don't understand it either, so that doesn't help. ;-) Baseball is my game, I love hockey too.
Me: LOL! I was a band nerd so I went to every single game and could tell you nothing about any of them. As far as the band was concerned, the games were just something that messed up the field got in the way of our halftime shows:-). I never had the boyfriend issue because in high school, football players surely didn't date band nerds. Cheerleaders were their choice, probably because those girls actually watched the games!!!
And as it turns out, neither of our husbands are football fans either. Mine takes great pride in being able to say that he has never watched a pro football game from start to finish. He will watch the Super Bowl commercials on YouTube after the fact, but that is the limit of his Super Bowl involvement...well...except that he is willing to share in game day snacks.
I have to say that at my house we are much bigger snack fans than we are sports fans. Snack foods are quick, easy, and, to me, pretty satisfying. Because I am a snacker, I have to be intentional about the snack foods that I make and keep at home. I would be perfectly happy with chips and cookies regularly, but even I know that that is not a good idea. LOL! I, the snacker, also have a viscous sweet tooth; so, as to be a responsible snacker, at least on the surface, I have tried to find snack foods that have at least a modicum of nutritious-ness as well as the ability to satisfy my need for sweet.
My solution is this week's recipes for spiced and candied nuts - sweet protein!
Cinnamon Almonds
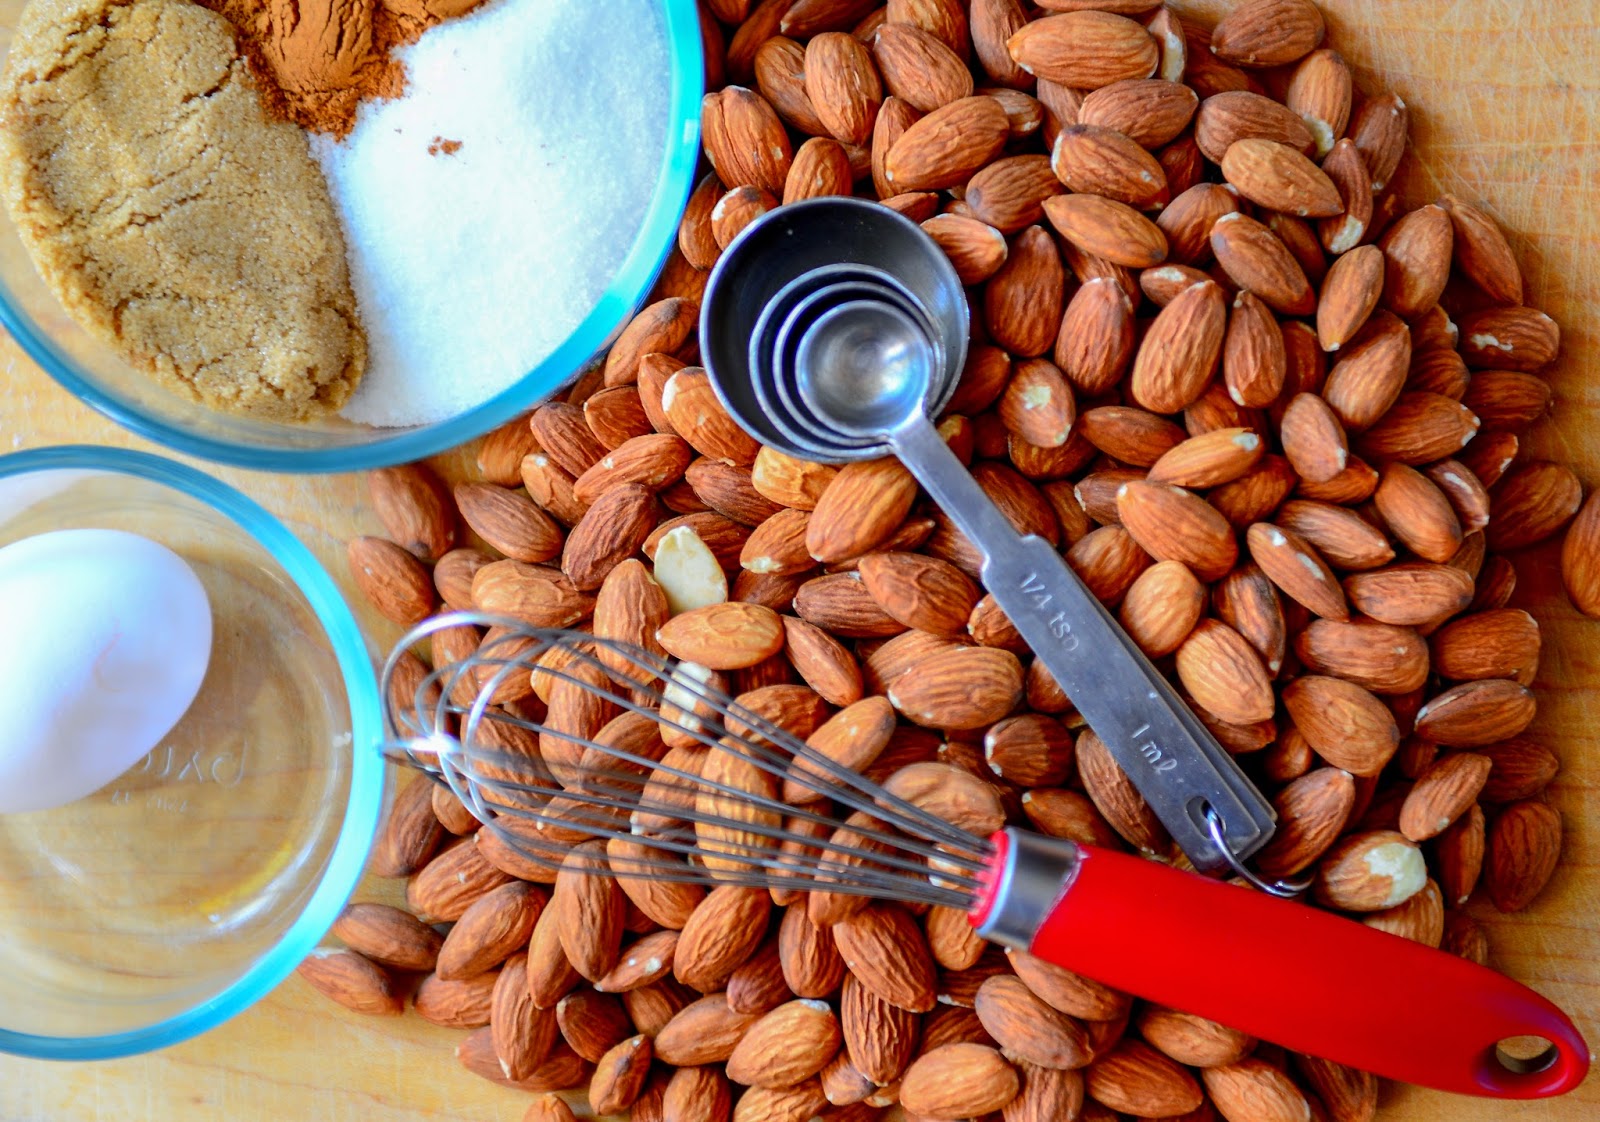
1 large egg white
1/2 cup white sugar
1/4 cup packed brown sugar
2 teaspoons (or more to taste) cinnamon
3 cups of raw nuts (I usually use almonds, but pecans work well too.)
Preheat oven to 300 degrees.
Line an 11x15 baking sheet with parchment paper. (You could also use a silicone pan liner, but I would not use foil.)
In a medium bowl, combine both sugars and the cinnamon.
In a small bowl, whisk the egg white with a tablespoon of water. Whisk until the egg becomes "frothy."
Place the nuts in a large bowl. Pour the egg mixture over the nuts and gently stir until all of the nuts are coated. You want to be careful not to break the nuts as you stir. Once all of the nuts are coated stir in the cinnamon-sugar mixture, again stirring to coat all of the nuts.

Spoon the nuts onto the baking sheet and spread into a single layer. Bake for 25-30 minutes, stirring at "half-time." Despite the football reference, that means at the 15 minute baking mark, not during halftime of the football game, unless of course you are making candied nuts rather than watching the first half of the Super Bowl and the two happen to coincide:-)
Let the nuts cool completely before serving. They can be stored in a sealed container for a couple of weeks.
And for those of you that prefer sweet and salty to just the sweet, here is an option for you.
Sea Salt Coated Butter Toffee Pecans

Ingredients:
2 cups sugar
2/3 cup water
2/3 cup water
6 Tbsp. butter
5 cup whole pecans
1 Tbsp. Sea salt
2 tsp nutmeg (freshly grated is a nice touch)

Spray an 11x15 baking sheet with cooking spray. Set aside.
In a small bowl combine sea salt and nutmeg. Set aside.
In a deep skillet large enough to hold all of the nuts and give you stirring room (I use a large cast iron skillet), add 2/3 cup water, sugar, and butter. Heat over medium heat until the butter melts. Stir constantly. Then add the nuts. Gently stir the nuts coating them with the butter mixture. Continue you cooking and stirring until the sugar becomes powdery, 12-15 minutes.. Continue to cook about 10 minutes longer until a deep golden candy coating forms on the nuts.
Remove the skillet from the heat and stir in salt and nutmeg. Quickly spread the nut mixture in a single layer onto the prepared cookie sheet. Sprinkle with additional salt, if desired.
Allow to cool before serving.
These recipes satisfy both my hunger and my sweet tooth. I feel a little less guilty about eating a handful of spiced nuts than I do about eating a half a bag of chips or a handful of cookies.
And for those of you who are avid football fans and have an emotional investment in the outcome of the Super Bowl, recent research shows that nuts are good for your emotional health. Some have gone as far as to say that a handful of almonds are as good as Prozac for combatting depression. This is attributed to their ability to lower blood sugar and raise seritonin levels. So, if your team is on the losing end of the scoreboard this weekend, have a few nuts to cheer you up and find solace in knowing that the football season starts again in seven months!
From Tracey G.


From Tracey G.
I love any excuse to make snack foods or appetizers - they happen to be my favorite kind of meal ;-) I was reminded of myself when I saw the movie "Mermaids" many years ago and Cher's character, the mom, made every meal as appetizers/cocktail party food with toothpicks and all, lol. I was like "Yeah! That's the way to eat!" :-D And I think it must be genetic as well, because Harry's become a fan of "picky foods" for dinner, lunch etc. If he had his way, it would be dinner that way every night for no special reason ;-)
As Kris said, when we were bandying about our ideas for food on Fridays, Super Bowl Sunday came up, regarding snacks and so forth and then the quite humorous discussion on whether or not we actually watch the game at all, lol. I guess I used to way back when, but that doesn't mean I enjoyed it, it was on the television by majority rule, so I just made sure I had a book to read, and that's how I spent my time while it was on - reading between prepping and serving the snacks! And honestly, it's been years since I've seen a Super Bowl, and that's not an exaggeration! I know it's a fairly simple game, but for some reason I threw up a mental block that since I didn't enjoy it, I therefore will not understand it and that was that, lol. There's no getting it through to me now... But snacks, they speak loud and clear and I have a great understanding of those! ;-)
I've collected my fair share of recipes for that sort of thing ("entertaining") through the years, and have tried many - some good, some not so good, lol. The good ones have found their way into "The Book" (my handwritten tried and loved recipes all collected in a spiral bound do-it-yourself recipe book) and there are many many, more in my collection of recipes that I've yet to try.
This recipe came with my Wilton cookie press that I got a few years ago, I remember seeing it in the little recipe book that came with it and I thought what a fabulous thing!! I was going to make this because it just sounded so darn easy and even more fun and easy because you use your press to make them! That's fast! And fun! But, I never did make them...until the other day. And by this time, I've lost the booklet that came with my press, so I had to travel to the Wilton site (no hardship there either, but way too easy for me to get off on a tangent of looking at cupcakes, cakes etc, lol) to see if by some stroke of good fortune they'd have it (or a version of it) on the site. Thankfully, they did! (and can be found here, under the appetizer section - Cheddar Cheese Spritz Crackers ) Of course, I deviated as I usually do, lol, because I find that for me, a recipe is a "guide". I don't think I've ever made a recipe "straight up" as written - there's always been something I've added or changed, I just can't help myself. Usually though when it comes to baking I try to stay on the straight and narrow because it's a lot of science too as to how the ingredients work together to produce a certain texture and so forth. But that doesn't mean I might not mess with the seasonings/flavorings etc, lol. And this recipe I made my "own" by adding more Worcestershire sauce and a few extra dashes of hot sauce ;-)
I also discovered that even doing a step wrong didn't hurt a thing, lol. In my haste I missed the part that said "in a separate bowl, mix the flour and seasonings together", lol, so I accidentally dumped the seasonings into the butter and cheese mixture along with the Worcestershire and hot sauce, lol. But, no harm done - I just made sure I mixed the "wet" ingredients extra well so that the seasonings were evenly distributed and combined well. And with that said, let me move on to the making of the crackers! Get the oven preheating to
Next, shred the cheese finely, and it's stated to not use pre-shredded cheese, so it's the old fashioned way to get shredded cheese, lol.
Once you've gotten your cheese shredded, it's time to mix it up with the butter...
Now it's time to add the seasonings, only the wet ingredients were to go in, the Worcestershire sauce and hot sauce, but I accidentally added the dry seasonings - salt and paprika, as well, lol. As I said earlier though, I just mixed them all very well to make sure it was all incorporated evenly, and it was fine ;-)
Now add in your flour to the butter/cheese mixture (and if you're following the recipe as you're supposed to, once you measure out the flour, it's time to add your dry seasonings to it - the salt and paprika, and combine it well with the flour)....
......and mix until the dough forms a smooth ball.
Next you place the dough into your cookie press, and using the disk of your choice, make your crackers. You can use the traditional spritz cookie disks, or I tried the disk that makes the flat ribbon. I extruded a long strip and then cut to the desired length with knife.
Place the cut ribbons onto the ungreased cookie sheet - or if you're doing a traditional spritz cookie shape, press right onto the cookie sheets...
You then bake them 10-12 minutes (I think I took mine even a little longer because they weren't brown enough yet, so it all depends on your oven etc) or until they are light golden brown. You let them cool 2 minutes on the cookie sheet on a rack, then transfer the crackers straight to racks to finish cooling. That's it!! Much simpler than I even imagined!
Now, here's the recipe, courtesy of Wilton.com, makes about 8 dozen crackers:
Cheddar Cheese Spritz Crackers
1 lb finely shredded natural cheddar (not processed and not pre-shredded) sharp cheddar or aged Swiss cheese
1/2 c butter, softened
2 tbsp Worcestershire sauce
dash hot red pepper sauce
1 1/2 c flour
1/2 tsp salt
1 tsp paprika
Preheat oven to 375°F. In a medium bowl, cream cheese, butter, Worcestershire sauce and hot red pepper sauce until smooth. In a separate bowl, mix flour and seasonings together. Gradually add to cheese mixture. Mix until dough forms a smooth ball. Shape dough into small logs and place in cookie press. Using desired disk, press shapes onto ungreased cookie sheet. Bake 10-12 minutes or until lightly golden brown. Cook 2 minutes on cookie sheet on cooling rack. Remove from sheet and continue to cool on rack.
____________
Thanks, Tracey! Now I want a cookie press!
____________
Thanks, Tracey! Now I want a cookie press!


