Showing posts with label blueberries. Show all posts

Sunday, August 14, 2016

Food Friday - Scones!

from Tracey G.


It's funny the day that Kris and I came up with scones for a Food Friday, if I recall correctly, she was still in the U.K. and we'd started talking about the scones she was enjoying. And then just like that, our texts crossed and pretty much said the same thing - "we should do scones for a Friday!", lol. And so, here are our scones!

My boys went to the local pick-your-own blueberry farm this week and I have plenty of fresh blueberries to work with, so I chose blueberry scones. This is a recipe by King Arthur that can be found here: Fresh Blueberry Scones 

It was easy and super yummy. Harry, who's never had a scone in his 7.5 years, loudly declared "I love scones!!" when he had one during our taste test! Yay! I love it when a recipe is a success! And if he likes it, along with myself enjoying it - I consider that a huge success.

Now, it does call for fresh blueberries specifically, and I am sure that has a lot to do with the way the dough is worked with, otherwise I think you'd end up with purple dough before you even got them in the oven, lol. It's not a huge amount required, just a cup, so I think even for me, in non-blueberry season it wouldn't be too hard or costly to make with the fresh blueberries in the grocery store. The only thing I wished I would've done differently in the execution of this recipe, and it's just for my preference, is that I wished I would've patted the dough into a circle instead of a rectangle as they call for - I had a heck of time getting evenly sized triangular scones, lol.

They state that they're yummy hot, cut in half and slathered with butter - and I am sure they are!! So, without further ado, here's the recipe!


Fresh Blueberry Scones


2 cups unbleached, all purpose flour or pastry flour (King Arthur brand recommended of course)
1/2 teaspoon salt
1/4 cup sugar
1 tablespoon baking powder
6 tablespoons cold butter, cut into pieces
2 large eggs, beaten
1/3 cup vanilla yogurt
1/2 teaspoon vanilla extract
1 tablespoon lemon zest or 1/4 tsp lemon oil (extract)
1 cup blueberries, picked over and rinsed
2 tablespoons melted butter
2 tablespoons sugar

1) Preheat oven to 375°F. Sift the dry ingredients together in a bowl. Add the butter and rub it into the dry ingredients with your fingers (I cut it in first with my pastry blender, then rubbed it in with my fingers).

2) Stir the eggs, yogurt, vanilla extract and lemon zest (or oil) together. Add to the dry ingredients and stir just until combined. Stir in the blueberries. This dough is the consistency of a wet drop-cookie dough.

3) Liberally flour your counter and your hands. Take the dough out of the bowl and place it on the counter. Pat it into a 1-inch thick rectangle. Cut into 10 triangular scones. Place on a well-greased cookie sheet (I skipped the greasing and just used parchment paper on the cookie sheet).

4) Brush the scones with melted butter, and sprinkle with sugar. Bake for 20 minutes, or until lightly browned and a cake tester inserted into a scone comes out dry. Cool completely on a rack. 


from  Kris B.


When in England, do as the English do.  I cannot tell a lie...while I was in the U.K. last month, I had my share of scones and tea.  It didn't help that the cathedral cafe at Bristol Cathedral where we were the choir in residence had pretty good scones.  Rehearse, eat a scone and drink tea, sing Evensong became my afternoon routine for the week we were there.  


I also managed to find many other places with good scones while we were traveling about as well.  I knew I would miss this luxury when I returned home.  I think it was a text message to Tracey while I was still away in which I was whining about how much I was going to miss scones that prompted this week's recipes.

I have always liked scones; I just don't think about them much here at home.  Except around my birthday.  My daughter always makes "take and bake" chocolate chip scones for me as a birthday gift.    Since my birthday is in December, the last batch is long gone!  I was eating plain scones in England.  Well plain with clotted cream and jam.  The chocolate chip ones that Brooke makes for me require no "garnishing."  They are good without any extras.  It is the recipe that Brooke uses that I am sharing this week.

I am glad to have a mid-year batch of scones as this last week has turned out to be a bummer of a week.  I had several pre-skin cancer spots frozen off of my arm.  It was really no big deal and they don't hurt.  They're just ugly blisters that now need to heal.  And then after being good and working our every day on the treadmill (to get rid of the remnants of all the scones) and ended up with shin splints and stress fracture in my left leg.  So, no walking/running for 4-6 weeks.  Needless to say, I'm seriously bummed about that.  I did negotiate with the doctor for limited time on the stationary bike.  But, that is just not the same.   So, I am drowning my sorrows in chocolate chip scones!  I know its not the most mature response to my situation, but its the one I've had.


This is the recipe that my daughter uses to make my favorite scones.  It is My Best Flaky Buttermilk Scones from the cookbook, A Passion for Baking by Marcy Goldman.


INGREDIENTS

4 Cups all-purpose flour
1/2 Cup sugar
1/2 tsp salt
2 tsp baking powder
1/2 tsp soda
1 1/2 Cups unsalted butter, cut into chunks and frozen
1 large egg
1 1/4 Cups buttermilk
* 1 Cup dark chocolate chips  

*The original recipe does not call for chocolate chips.


Preheat oven to 425 degrees.  Stack two baking sheets together and line top with parchment paper.  Arrange oven rack to upper third position.


In a food processor bowl, add flour, sugar, salt, baking powder, and baking soda and pulse briefly.  Add butter and pulse to make a course grainy mixture.  Turn our into a large bowl.  Make a well in the center and add the egg and most of the buttermilk.  Lightly stir with a fork to blend.  Add the remaining buttermilk, if necessary, to make a shaggy dough.  *Stir in the chocolate chips.


Turn out mixture onto a lightly floured work surface and knead 6 to 8 times until mixture is just barely rollable.  Pat or roll to a 1 inch thickness and cut into desired shape.  (The recipe calls for the scones to be cut into wedges.  Brooke usually makes mine square, because it is way.  The scones I was eating in England were round, so I made this batch round.  The shape really doesn't matter.  Lol!)    Place the scones on he prepared baking sheet.  Brush the tops with milk or melted butter and dust with sugar.  


Bake until golden, about 12-15 minutes.


Sunday, May 29, 2016

Food Friday - Super Salads

from Kris B.


I am a huge fan of salad and I'm not particular about what kind of salad I eat.  The only thing here is that I am not a fan a most salad dressings.  Even when I'm not watching my calories, I don't eat dressing on my salads.  So the problem for me, as I am looking for ways to trim those unnecessary calories, is not adjusting to eating "dry" salad, but frather inding a dressing that I will enjoy when the salad must have a dressing.  And let's face it, chicken salad is not salad unless it has dressing.

This is a simple chicken salad, given its flavor by tarragon and chives and its crunch from toasted almonds.  The dressing is a mixture of low-fat plain yogurt and light sour cream.  Aside from cooking the chicken, it takes no time to prepare; but, it is best if allowed to sit in the fridge for 12-24 hours to give ample time for all of the flavors to meld together.

INGREDIENTS
3 small chicken breast halves
3 ribs of celery, diced
1 bunch of chives, finely chopped
2 TBS fresh tarragon, finely chopped
1/2 Cup low-fat plain yogurt
1/4 Cup light sour cream
1/4 Cup toasted almonds
Salt Ground black pepper
Salad greens

Coat a skillet with non-stick cooking spray.  At medium high heat, cook the chicken, 4-6 minutes on each side until there is no pink and the juices run clear.  Remove from heat and allow the chicken to rest for ten minutes.  Once cooled, cut into bite-sized pieces.

Combine the yogurt, sour cream, celery, tarragon, and chives in a medium bowl,  Once it has cooled, add the chicken.  Mix.

Cover and refrigerate for at least an hour or up to 24 hours. (The longer it is refrigerated, the better the salad will be.)

Just before serving, add desired amounts of salt and pepper and the almonds, reserving a few for garnishing, if desired.  Serve on a bed of your favorite salad greens.

Makes 4 servings.

Nutrition information: per serving; 177 calories; 5g fat; 8g carbohydrates; 25g protein; 3g fiber; 182mg sodium


from Tracey G


Another funny opposite between Kris and I, is my love for salad dressing. I was one who only ate salad so I could have dressing! After all, it would look kind of crazy me eating salad dressing from a spoon! I was never a fan of creamy dressings (other than for potato salad, macaroni salad chicken salad etc), ranch was a dip for me, not something that went on my salad and so forth. I preferred, and actually still do, a vinaigrette-style dressing. My first ever salad dressing was plain vinegar and olive oil. I remember once, as a little girl, my mom had run out of olive oil - it was a staple in our household and at the time and where we live, you couldn't get it here. So we used to bring it back up north with us from visits downstate in the Detroit area - same with feta, but that's another story, lol. So what did she do? She substituted VEGETABLE oil in its place. I remember I almost spit out my bite of salad (I actually may have!) - it was awful! Like taking a drink of your iced tea and discovering it's Coke or vice versa, it was just wrong. She never ever did that again.

But anyway, I do love a good vinaigrette, and I think one of my all time favorites is a raspberry vinaigrette which I use on this salad. It is a "lite" version, and it's one of my particular favorites. I use this one even when I'm not eating mindfully because I just love the taste of it - it's Ken's Steak House Lite Raspberry Walnut Vinaigrette. It's the best one I've run across that reminds me of the very first one I tried in a restaurant. The rest of the salad I pulled from various things I love in salads. I had this idea to just pull them altogether and tie them up with my favorite dressing, and I was very happy with the results!! It was actually yummy enough that dressing may not have even been needed as all the flavors mixed together to be just right on their own.

The ingredients are approximate and you can, once again, add or subtract whatever you like!

Red, White and Blue Salad

serves 6

8 cups spring mix salad greens
2 cups halved fresh strawberries
1 cup blueberries
1/2 small red onion, thinly sliced
1/3 cup raspberry vinaigrette
1/2 cup crumbled feta

Combine greens, onion, and berries in a large bowl; drizzle with vinaigrette and toss to combine. Sprinkle with cheese and serve immediately.


Saturday, May 14, 2016

Food Friday - High In Goodness, Low In Calories

from Kris B.


We are two and half weeks in to our “weight reduction plan.”  With encouragement from another, both of us are doing pretty well staying within our allowed calorie range each day and not feeling hungry.  There does, however, come a time when we want a sweet snack, not a reward necessarily, but a sweet something that we can eat and enjoy and not feel guilty about having had.  It is from this place that we bring you this week’s recipes.

I like cake, but I am not a big fan of frosting.  Even though I have a powerful sweet tooth, most frosting is even too sweet for me.  I often scrape all but a thin layer of the frosting from cake and cupcakes.  I know.  It sounds like a waste; however, often there is someone nearby that has the exact opposite preferences - they love the frosting but not the cake.  It works out for all involved!  Lol!  When I make cake at home, I don’t go to the trouble of making frosting  unless I have to.

A favorite cake at our house is angel food cake.  No one expects it to have frosting.  Perhaps a dollop of whipped cream, and some kind of fruit and it is perfectly dressed and good to go.  Angel food cake is also low in calories abd fat free!  This recipe weighs in at 146 calories per (naked) slice.  Adding fruit and a little whipped cream ups that at little, but this treat still comes in far below the average for most desserts.

INGREDIENTS
12 eggs, whites only) or 1 1/2 cups egg whites)
1 Cup flour
1 1/2 cups sugar, divided
1/4 tsp salt
1 tsp cream of tartar
1 tsp vanilla
1 tsp almond extract
1 TBS lemon juice

Preheat oven to 325 degrees.

In a medium bowl, sift together the flour and half (3/4 cup) of the sugar.

Using an electric mixer, whisk the egg whites until  foamy..  Add the salt and cream of tartar.  Continue to whisk until soft peaks form.  Add the remaining 3/4 cup of sugar a little at a time.  Once stiff peaks have formed, beat in the vanilla, almond extract, and the lemon juice.  

Using a spatula, stir the sifted flour and sugar into the egg white mixture 1/4 cup at a time until all is incorporated.  Evenly spread the batter into an ungreased angel food cake pan (tube pan).

Bake for 50 minutes or until cakes feels slightly springy to the touch and is golden brown.  Remove from oven and invert the pan on a glass bottle to cool.  Once cooled, loosen the cake from the pan with a metal spatula and invert cake onto a plate.


Eat the cake as is, with a little non-dairy whipped cream (if you are watching calories) and fruit.  Or, if you must, drizzle with a glaze or sauce of your choice.

Makes 12 servings

146 calories; 5g protein; 39g carbohydrates; 2g fiber; 29g sugar; 0 fat; 0 cholesterol; 100mg sodium


From Tracey G.


As we come to the end of Week 3 (I've rounded up, lol) in the new Mindful Eating challenge as I like to call it, it's occurred to me that we need some healthy sweets as well occasionally. I'm not a big sweet eater, but sometimes I just gotta have it! Cupcakes, cakes, frosting and so forth. I want to be prepared for such things and have a few healthier alternatives in my bag of tricks. Not that that means I'm not going to enjoy the real deal occasionally, after all there's nothing off limits, it's all about moderation. I would just like a few healthier alternatives to old favorites and some new just-because-they-sound-good healthier things at my disposal.

Recently, I bought myself a subscription to Eating Well magazine, if their magazine is half as informative and helpful as their website, it will be deemed a good move on part! I just got my first issue this past week and this was one of a few recipes in it I decided I was going to try. I did a bit of a hunt around the internet for blueberry pound cake recipes - wanting to see how much this one might differ, and from most of the ones I ran across, this had about half the calories of most, as this comes in at about 303 calories per serving according to the recipe notes. And the 1-inch thick slice - as pictured in my photo, that is considered a serving, is really a pretty good size!

Aside from it being really yummy, it's also a one-bowl recipe - nice! It came together easily, which is always a bonus. I also know it was a hit with my boys - Harry told me that I deserved 63 kisses for it, where he came up with that number as being a good rating is beyond me, but I'll take the kisses and he took a second slice! Hubby asked me if it was easy to put together, which I've come to learn is code for "so, will you make this again because it's really good!"!

I did have to make one major change because I realized I didn't have the ingredient - it calls for 1.5 cups of white whole-wheat flour, I didn't have any, so used unbleached all-purpose. And a minor change was I used frozen blueberries - they aren't the greatest in the stores this time of year fresh, so frozen are always a staple I have on hand. 

Blueberry-Lemon Ricotta Pound Cake

Courtesy of Eating Well Magazine and can be found here: Blueberry-Lemon Ricotta Pound Cake

8 Servings

3/4 cup granulated sugar
5 tbsp unsalted butter, at room temperature
3 large eggs, at room temperature (see tip below*)
3/4 cup part-skim ricotta cheese
2 tbsp lemon zest
2 tbsp lemon juice plus 1 tsp, divided
1 tsp vanilla extract
1 1/2 c white whole-wheat flour
2 tsp baking powder
1/2 tsp salt
2 cups fresh blueberries (I used frozen)
2 tbsp packed confectioner's sugar

1. Preheat oven to 350°F. Coat a 9x5-in. loaf pan with cooking spray and line the bottom with parchment paper.

2. Beat sugar and butter in a large bowl with an electric mixer on medium-high speed until creamy**. Beat in eggs, one at a time, until fully incorporated. Reduce the mixer speed to medium-low and beat in ricotta, lemon zest, 2 tbsp lemon juice and vanilla until just combined. Sprinkle flour on top, then evenly sprinkle baking powder and salt over the flour. With the mixer on low speed, beat until almost combined. Add blueberries and  gently fold into the batter. Transfer to prepared pan.

3. Bake the cake until starting to brown around the edges and a tester inserted in the center comes out clean, about 1 hour. Let cool in the pan on a wire rack for 20 minutes. Run a knife around the edge to loosen the cake, then invert it onto the rack. Carefully turn it right-side up. Let cool completely.

4. Clean the bowl, add confectioner's sugar and whisk in the remaining 1 tsp lemon juice until smooth. Brush the glaze on the cake.

Serves 8: One 1-inch thick slice each

Nutritional information: Calories 303, Fat 11g (Saturated Fat 6g), Cholesterol 96mg, Carbohydrates 45g, Total Sugars 25g (added 21g), Protein 8g, Fiber 3g, Sodium 319 mg, Potassium 124mg

*This is a trick I've used for ages to get eggs right out of the refrigerator to room temperature quickly, that they suggest as well: Place the eggs (in the shell) in a bowl of lukewarm water for about 5 minutes. I usually do that first when I start a recipe that needs room temp eggs, so that by the time I'm ready for them, they are ready for me!


**They do note that for best cake texture to make sure you beat it long enough together to look creamy, and the time it take can vary. I never really did see "creamy", but it still turned out well for me!


Friday, November 20, 2015

Food Friday - Family Favorites

from Kris B.


It is hard to believe that the holiday season is here!  It's that time of year where my life is made possible only by the many lists that have diligently created - lists of social obligations, Christmas gifts to buy, chores to be done, and of course, meal planning tasks.

Sometimes I wonder why planning Thanksgiving dinner is that difficult since it is a meal of tradition; everyone has their favorite dish and it is my job to make sure that all those favorites end up on the holiday table. In my family, we don't have generations of traditions by which to abide when it comes to our holiday meals, but I know many families that have had the same dishes as part of their Thanksgiving celebrations for years and years and years.  And often when they stop and think about it, they realize that some of the things that are still being served were a favorite of someone who is no longer living and no one now even likes "that" dish.  This scenario reminded me of a funny song that I sang with a chorus several years back, "Lime Jello Marshmallow Cottage Cheese Surprise."  If you need a little bit of comic relief during these hectic days, click here.

We don't have any Lime Jello Marshmallow Cottage Cheese Surprise at our house, but we do have some foods that are fast becoming holiday traditions.  One such food is pumpkin butter.  A former friend and I used to make it every year for our church's Christmas bazaar.  It quickly became a favorite of my then toddler second child.  Over the past twenty years, I have tweaked the recipe a little here and there to try and make it the best it can be and to add my own personal touch.  A jar of pumpkin butter used to be the standard holiday gift for my girls' teachers, as well as for many of my friends.

Because of the craziness in my life at the end of last year, I did not make any holiday pumpkin butter. in 2014  Though life still hectic this year as well, I managed to get the first batch of pumpkin butter made this week.  (Yes, Erin.  You may have a jar now.)  As I was making it, I was reminded of just how good pumpkin butter is.  I will definitely be making a few more batches over the coming weeks!

INGREDIENTS

2 15oz. cans of pumpkin puree
1 1.75oz package of pectin
1 TBS pumpkin pie spice
3 1/2 cups white sugar
1 cup brown sugar
1 TBS vanilla

Stir pumpkin puree and pectic together in a good sized heavy pot.  (You want a pot that is big enough so that once you add the sugar, the mixture will not boil over or "spit" hot pumpkin butter over the top.)  Continue to stir regularly while bringing this mixture to a boil.  Once boiling, add all of the sugar at once, the pumpkin pie spice, and the vanilla.  While stirring constantly, again bring the mixture to a boil.  Allow to boil for two minutes.  Remove from heat.

The pumpkin butter can be canned using standard canning procedures; or, it can be stored in airtight containers in the refrigerator for up to one month.

Pumpkin butter is fantastic on your morning toast or English muffin, on crackers as an after school snack, or as filling for your holiday thumbprint cookies.  And, as members of my family will tell you, it is also good on a spoon right out of the jar.


by Tracey G.


Thanksgiving has never been a time for sticking with tradition for me, I don't know why, but I've never felt obligated to one certain dish. I've always been very open-minded about my menu. I have made turkeys the majority of the time because I like the sides that go with it, lol. And I like to make turkey noodle soup with the left-overs! But I'm always willing to add in things, omit things and whatnot.

I've been looking for a recipe for the Thanksgiving morning, something simple that could maybe pave the way for a "tradition" of sorts and this recipe came along at the right time so I thought I'd give it a try. I mean seriously this sounded pretty straight-forward yummy, lol. And it is - it's really good. Harry loved it and will go perfect with coffee at any time of the day! I must thank Taste of Home for coming through for me once again!

Down East Blueberry Buckle


2 c flour
1/4 c sugar
2 1/2 tsp baking powder
1/4 tsp salt
1 large egg
3/4 c 2% milk
1/4 c butter, melted
2 c fresh or frozen blueberries

Topping:
1/2 c sugar
1/3 c flour
1/2 tsp ground cinnamon
1/4 c  butter, softened

1) Preheat oven to 375° F. In a large bowl, whisk flour, sugar, baking powder and salt. In another bowl, whisk egg, milk and melted butter until blended. Add to flour mixture, stir just until moistened. Fold in blueberries. Transfer to a greased 9-in. square baking pan.

2) For topping, in a small bowl, mix sugar, flour and cinnamon. Using a fork, stir in softened butter until crumbly. Sprinkle over batter.

3) Bake 30-35 minutes or until a toothpick inserted in center comes out clean (do not overbake) Cool in pan on a wire rack. Serve warm or at room temperature. 


Saturday, September 5, 2015

Food Friday - Feeling Blue

from Kris B.


Feeling blue may be a little strong for my feelings this week, but ithe title worked well with the week’s recipes.  LOL.  For me, feeling a little out of sorts may be more appropriate.  I started back to work full time this week and I did not make the transition from the freedom of my summer schedule to the structure of the academic schedule very gracefully.  Simply stated, I failed grandly at time management; that’s why Food Friday is Food Saturday this week.  I am glad to be back at school because I really do love teaching.  Meeting our new students and catching up with those that are returning is always such a pleasure.  I teach the final three semesters of a four semester sequence of courses.  By the time those students and I have been together that long, we know each other quite well.  On the first day of classes this semester, three of my students who completed the sequence last spring were sitting in the room with this semester’s fourth semester class.  Responding to my somewhat befuddled look, they said, “We are going to miss your class this semester so we thought we’d just come visit.”  It is hard to feel too blue about going back to school when the school year begins like that.

On to this week's recipe...

When it comes to talking about what can be added to cookies, or muffins, or cakes at my house, blueberries are one of the few things on which my husband and I agree.  You heard about our raisin and chocolate chip dilemma a few weeks ago.  But blueberries?  Blueberries are always acceptable!  And pound cake is right up there with angel food cake as one of my favorites.  In case you haven’t noticed already, my tastes are fairly simple.  You just can"t go wrong with pound cake.  Because its ingredients are so basic, it can be made just about any time you have a craving!

The dry and ingredients are flour, sugar, salt and baking powder, pantry staples.


***As an aside…Tracey and I have realized that we promised you guys stories of friendship and photography, as well as food, here.  We are going to try to do a little better job of writing about those things as well.  I’m going to start by sharing a story that comes from shooting the photos for this post.  As I said, I did not plan my week well, so I was trying to get all of this done, cooking, processing phots, and writing, on Friday.  That meant that I needed everything to go smoothly and as I planned.  I had given Tracey a heads up that it would probably be late when I got it all done and that I would be the one to hold up the post for this week.  I got started with the cooking.  Everything is going along well.   Then I took a few photos of the mixer doing its thing.  I glanced at the preview of the photos on my camera.  I then sent the following message to Tracey:
Note to self: Get yourself a glass bowl for your Kitchen Aid mixer because you look like **** reflected in the metal bowl! 
Her response, “LMAO.” 
 This is why we have so much fun working together!  Now back to the important stuff.

Combine tthe dry ingredients with some wet ingredients - eggs, butter, and vanilla -


 If I don’t photograph the butter then the calories from the fat don’t count, right?   

I think that I have mentioned before that I make my own vanilla extract.  All it takes is a few vanilla beans taking up residence in a mason jar of vodka for a few weeks. 

Add  some blueberries…


Mix them all together, 


and you get pure goodness!


Okay, it’s not quite that simple.  There are a few important steps in this recipe that do make the difference between success and…not success with this cake.

INGREDIENTS

1 Cup unsalted butter plus 1 TBS
2 Cups sugar plus 3 TBS
3 Cups all-purpose flour, divided
1 tsp baking powder
1/2 tsp kosher salt
4 large eggs
1 tsp vanilla extract
2 Cups fresh blueberries

Preheat oven to 325 degrees.

Coat a tube pan with 1 TBS butter and then sprinkle in and coat with 3 TBS sugar.  Set aside.

In a bowl, combine 2 cups of the flour, salt, and baking powder.  Set aside.

Cream together the remaining butter and sugar.  Use a stand mixer with a paddle attachment, not the whisk.  Beat on medium speed for 5 minutes.  Yes, 5 minutes!  Then, add the eggs one at a time, followed by the vanilla.  Continue to beat the mixture for another 3 minutes.  

With the mixer on lower, add the dry ingredients, mixing only until the ingredients are incorporated.  Do not over mix!!!

Place the blueberries and the remaining cup of flour in a plastic zipper bag and toss.  Coating the blueberries with flour keeps them from all "sinking" in the cake.  Fold the berries into the batter by hand.

Bake for an hour and 15 minutes, or until a knife inserted in the middle comes out clean.  Let the cake cool for a few minutes before turning out of the pan and continuing to cool on a wire rack.

***  A bit of lemon zest and/or lemon extract is a nice addition to this recipe.


Happy Labor Day, everyone!  
Have a fun a safe holiday weekend.

by Tracey G.


As Kris and I were getting ready for this "Friday's" post, everything seemed to just go downhill in my camp, lol. I ended up having to take Harry to the after-hours clinic at our doctor's office due to ear pain on Thursday evening after a miserable Wednesday night, and come to find out he's got an ugly ear infection. So, the past few nights since, oh, Wednesday, have involved very little sleep, and every time I get something on a roll after he's asleep, he's awake and my work gets put on hold, lol. I am hoping that a couple full days on the antibiotic will start to see some improvement! Poor kid is miserable and the first day of school is Tuesday. What a way to start the year, the doctor wanted to see him back next Friday, so the first week of school he's either going to be late on that day or absent depending on the efficiency at the doctor's office, lol.

So, that's my reason why Food Friday became Food Saturday for me as well!! ;-)

Labor Day weekend reminds me of a special dessert my mom would make, not that she made it, every Labor Day weekend, because I couldn't even tell you if she ever made it on a Labor Day weekend, lol - but simply because it did. Her birthday was just August 22, so I guess she's been on my mind a lot. But anyway, the dessert would be the Stern Reunion Blueberry Torte, my mom was a Stern so was from her side of the family. I didn't call it that because to me, and one of my best friends who I think loved it more than me (if that was possible!), it was simply known as my Mom's Blueberry Torte, lol. The funny thing is, I've never made it. My friend requested it as a wedding gift, lol, a pan of it all for her that she didn't have share - she  may have shared with her new husband, lol, I'll have to ask her one of these days, but she's made it through the years, and I can't believe I never have. It's not like I didn't have the recipe, lol. I couldn't even tell you the last time I'd even had it... So I knew it was time to make it.

As I was making it, I had to laugh - mom only made it for special occasions, holidays and whatnot, so I always thought it was labor intensive so therefore, saved for certain occasions - like the pecan tarts she'd make every Christmas, they were special because that was the only time of year we had them, lol. But the torte was REALLY simple to put together and fast, lol. I was reminded of the old Rice Krispies Treat commercial where the mom dusted herself with flour before she took the treats, wearily, out to the family as if it had been one of the most difficult things to produce, yet she and we knew it was one of the easiest. ;-) I knew mom more as a "cooker" instead of dessert maker/baker kind of person, so whatever she did make as a dessert, I guess would be her signature items, lol, like Blueberry Torte or Pecan Tarts. This truly was one of the things I grew up on, she'd made it ever since I was a kid, and eating it was a total blast from the past - and in such a good and yummy way! 

These are the crust ingredients - bottom then clockwise: chopped walnuts, brown sugar, flour, vegetable shortening and butter. That's it.

Mix all of the ingredients together and press into the bottom of a 9x13" pan. Then bake at 400° F for 15 minutes or until lightly browned. While that's cooling start getting your filling ingredients ready... 

The filling ingredients are pretty simple too - the filling part is made up of: vanilla, powdered sugar, cream cheese and Dream Whip prepared per package directions. The "topping" is a can of blueberry pie filling. It's about 2 cups - so if you wanted to make your own with fresh blueberries sugar, water and cornstarch kind of thing that's the least amount you'd need. I do have a note in my recipe book to use 1-2 cans of filling, so the amount is another one of those things that can be played with to suit your taste ;-) Next time I make it, I am going to use more, likely 2 cans or make my own blueberry filling/sauce. Oh heck, for that matter, you could use whatever pie filling captures your fancy, I would like to try lemon and also make my own fresh peach filling to try on top...or even a raspberry....I guess I could keep going, lol. But you all get the idea. ;-)

With a mixer (either hand held or stationary) combine the powdered sugar, cream cheese and vanilla until smooth. Then, prepare the Dream Whip according to the package directions. If you have the space, you can make the whipped topping ahead of time and refrigerate it until you're ready to use it.

Fold the whipped topping gently into the cream cheese mixture until thoroughly combined...

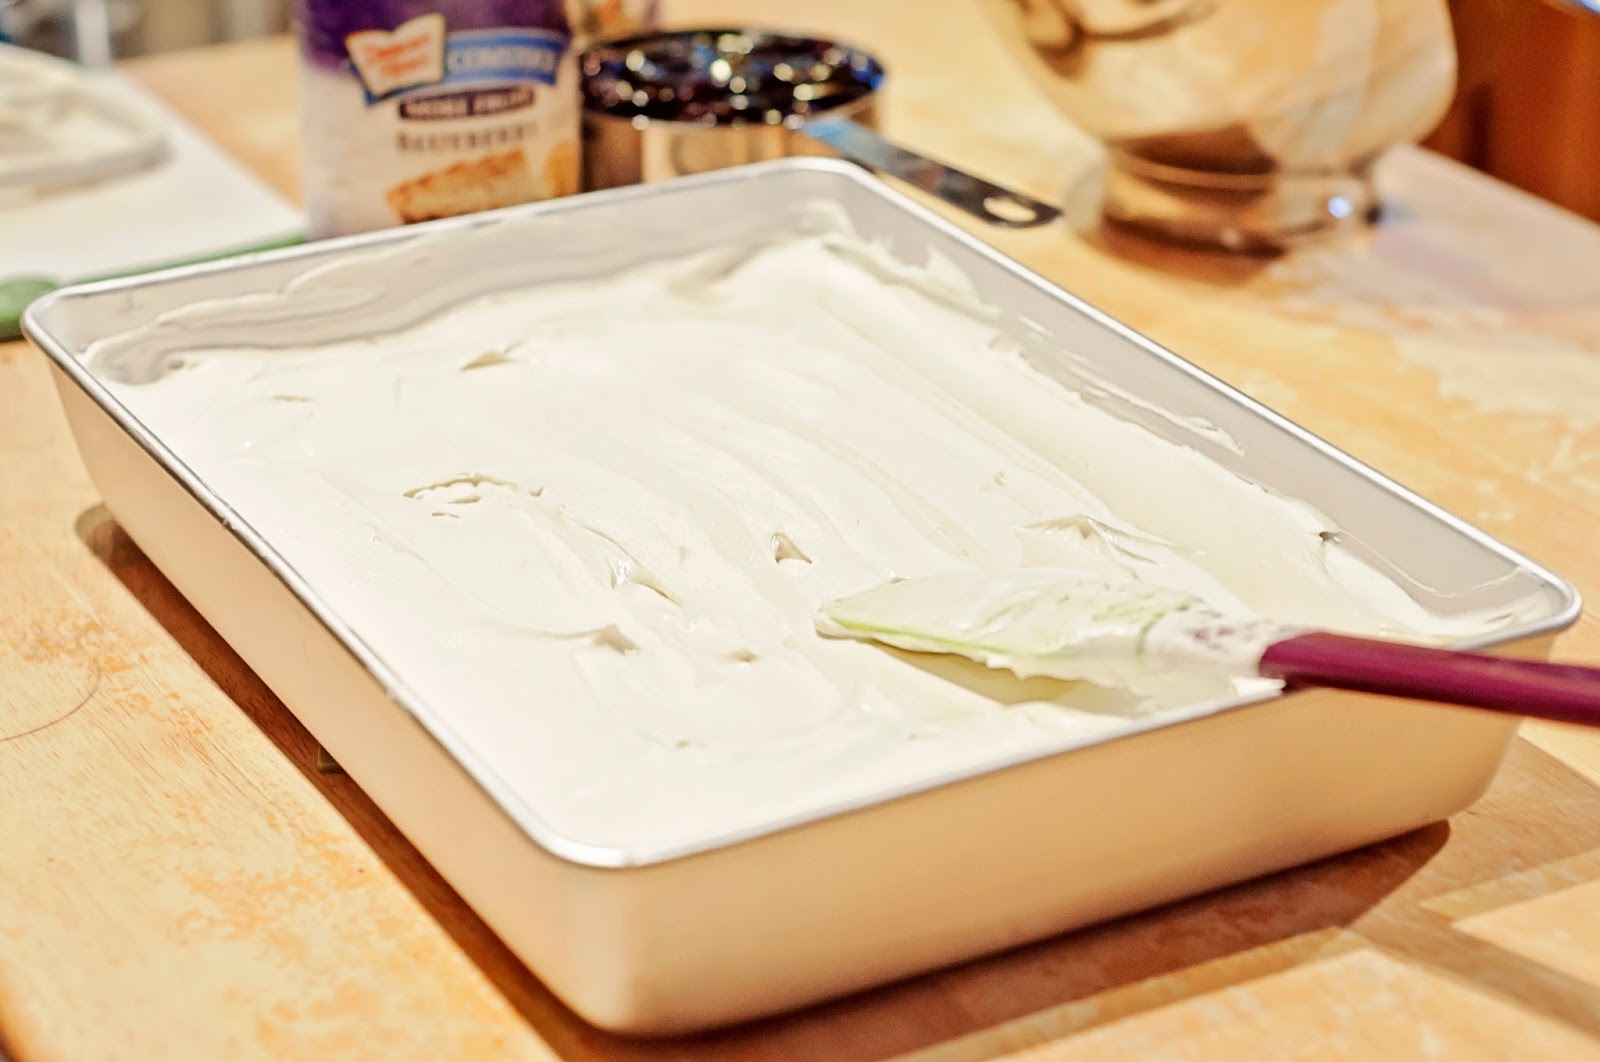
...then spread the cream cheese filling, evenly, over the cooled crust. Now, at this point, had I read my little notes on the recipe, I would have read the suggestion from Mom that you can refrigerate the torte at this point for awhile - it would have made the pie filling easier to spread over the top. I battled the cream part wanting to be pulled into the pretty pie filling, lol, and that could have been avoided. ;-)

I put the pie filling on in even lines/spoonfuls so that it can then be spread a little easier to cover the top. After you do that, all that's left is to refrigerate at least 2 hours before you serve. Now, again, here's a note on that - one that's not in my book but that I discovered while eating this the same day it's made - the crust is rather hard, lol. But, the next day, it was perfect, easy to cut and easy to eat. Next time I'll remember that - and it even just tasted better, lol. ;-)


Mom's Blueberry Torte (a.k.a The Stern Reunion Blueberry Torte)


Crust:

2 c flour
1/2 c brown sugar, firmly packed
1/2 c vegetable shortening
1/2 c butter, softened
1 c chopped walnuts

Mix together the ingredients. Press into the bottom of a 9x13" baking pan and bake at 400° F for 15 minutes or until lightly browned.

Filling and Topping:

2 pkg Dream Whip whipped topping mix
1 8 oz. pkg cream cheese, softened
1 c powdered sugar
1 tsp vanilla
1-2 cans blueberry pie filling

Mix together the cream cheese, powdered sugar and vanilla until well blended and smooth. Prepare the Dream Whip packages according to package directions. Fold into cream cheese mixture until well blended. Spread over top of cooled crust. Top with pie filling. Refrigerate at least 2 hours before serving.

(you can refrigerate the crust/cream cheese mixture layer before spreading on the pie filling, makes it easier to spread!)